Task 1 : How to create/launch Application using Terraform

Steps to launch App using terraform …
1.Create the key and security group which allow the port 80.
2. Launch EC2 instance.
3. In this Ec2 instance use the key and security group which we have created in step 1.
4. Launch one Volume (EBS) and mount that volume into /var/www/html
5. Developer have uploded the code into github repo also the repo has some images.
6. Copy the github repo code into /var/www/html
7. Create S3 bucket, and copy/deploy the images from github repo into the s3 bucket and change the permission to public readable.
8 Create a Cloudfront using s3 bucket(which contains images) and use the Cloudfront URL to update in code in /var/www/html
Solution :
Step 1: create the key and security group which allow the port 80.
→Creating the key pair from aws cloud … Click on create key pair and then download the key for login purpose ….

→Now creating security group for allowing SSH and HTTP protocol… It will allows SSH and HTTP protocol

Step 2 & 3: Launch EC2 Instance .. In this use the key and security group which we have created in step 1.
→Code for Launching instance using terraform …

Step 4: Launch one Volume (EBS) and mount that volume into /var/www/html
→ Launch EBS insame region where EC2 instance launched with size of 1 GiB …and then attach to EC2 instance

→For mounting the volume , we need connection to EC2 instance … After connecting to EC2 instance , we need to mount the volume , so that we have one function called “ remote-exec ” … Here is the code …

Here ‘ sudo git clone ‘ command used for copying the pages from github.com,, So we done with Step 6 …
Step 5: GitHub account has the webpage …Here is my GitHub account and i have uploaded the index.html file

Step 7: Create S3 bucket, and copy/deploy the images from github repo into the s3 bucket and change the permission to public readable. And also I am uploading the image from my base system …

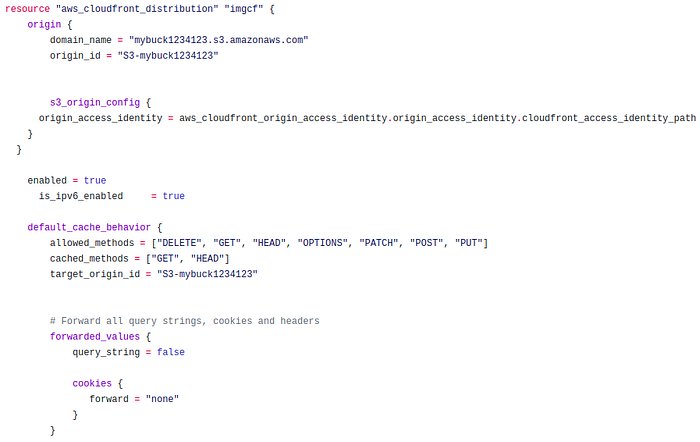
Step 8 : Create a Cloudfront using s3 bucket(which contains images) and use the Cloudfront URL to update in code in /var/www/html ..
→ Creating Cloud front …

→ copy Cloud front url and paste into the .html file …


Now run the command “ terraform apply — auto-approve ” in the folder where u have written the code with .tf extension …


Now type the IP address of EC2 Instance .. In my case it is 35.154.49.191..
Output is ::

Finally , Done with the task step by step …
My github url is https://github.com/KumarNithish12/cloud-task-1.git Go through this link for code ..
…. Signing off ….
